This post may contain some affiliate links. when you buy something through these links, I earn a small commission at no extra cost to you. This helps maintain my publishing activity. Thank you!
Maybe you are a fan of baguettes but you have never tried to make your own at home! I invite you to discover this ‘baguette experience’ and I hope it will please you!
According to some historians, the first baguette was French and was shaped and baked during the Napoleonic wars. They say that the bakers were ordered by advisers to Napoleon Bonaparte, to make bread thin and long instead of round. The idea was to make it easy for the soldiers to carry their bread either by putting it in their pockets or attaching it to their feet.
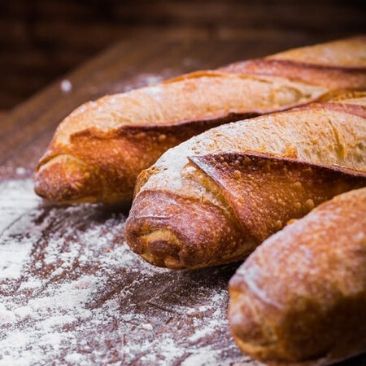
Baguettes are considered to be the most popular yeast bread. They have thin crispy crusts with a wonderfully soft chewy interior and a light wheat flavor. The slashes on the top of these beautiful loaves provide escape routes for the gas and help the loaf retain the perfect long thin shape.
Making great baguettes at home is a lot easier than one can imagine! I will share with you, in this article, an easy recipe that will allow you to make beautiful loaves even if you are a beginner in the bakery! Without a kneading machine or a bread maker, the result will be amazing and the experience will be unique! You will enjoy your own warm chewy baguettes, and smell their incomparable freshness
How To Prepare Easy Homemade Baguettes:
Each bread type has its own rising time. This rising period along with the type of flour and the way of baking gives bread its unique taste and texture. Concerning this hand kneading baguettes recipe, it requires four rest periods that we should respect. This beautiful bread deserves patience!
Ingredients:
- 25oz/700g Strong White Bread Flour
- 1/2 tsp Instant Dried Yeast
- 1 1/2 tsp Kosha Salt
- 19oz/520g Cool Water
Directions:
Kneading The Dough:
- In a large bowl, put your bread flour.
- Add yeast and whisk into the flour.
- Add kosha salt the same way. I recommend Diamond Crystal kosher salt for perfect results!
- Add cool water and mix the ingredients thoroughly.
- Cover with plastic wrap and let the dough rest and rise for 45 minutes.
- When the period is finished, remove the dough and fold for about 1/2 minute. The dough should start to be elastic and sticky. Accordingly, your hands should be wet so that it will not stick to them. Note that this is the first of four 45 minute rises, you will need three other periods. After each rest period, take the dough out of your bowl and give it a fast-fold. This process of four periods will add a lot of flavor to your homemade baguettes.
- Return the dough to the bowl for the second period and repeat the previous procedure as explained. Keep hands and scraper wet since the dough will become stickier, period after period.
- After the third and the last period, The dough will look smooth and full-bodied.
Shaping The Dough:
- Flour the work surface and turn out the dough.
- Sprinkle flour on the dough and divide it into four equal pieces.
- Continue kneading the dough pieces and adding flour until they become less sticky. when kneading, tap the dough against the work surface so that the gas escapes.
- Once done, place them and cover with lightly oiled plastic wrap.
- Let them rest for 15 minutes and prepare a well-floured baker’s couch using a cotton pillowcase, in the meantime.
- After the rest, start forming your classic baguettes by manipulating the dough into a rectangle (Fold the long sides into the center and, after that, fold the bottom and the top into the center). Do not forget to pop the gas bubbles.
- Roll the dough towards you and when you reach the end, use the heel of the palm to seal the edges. Now, with the palm of your hands, gently press and roll the loaf into a long baguette form. Start with your hands in the middle of the loaf and gradually move them towards the outer surface of the loaf.
- When you finish shaping your baguette, sprinkle it with more flour and place it on the couch.
- Follow the same procedure for the other loaves. You have to make sure there is a sufficient amount of flour on the couch, otherwise, the baguettes will be difficult to remove. You should, also, create pleats or just leave some space between the loaves.
- Cover with a tea towel and let them rise for 20 minutes.
Baking The Baguettes:
- Set your oven to 400°F/200°C and keep your baguettes rise for another 10 minutes when the oven heats up.
- To make these long thin loaves extra crispy, create a steamy atmosphere by placing a pan of hot water on the bottom rack of the oven.
- When the baguettes look ballooned and puffy to start cooking them, transfer them onto your baking tray. If you meet any difficulty to transfer them with your hands safely, use flat cardboard covered with aluminum foil.
- Using a razor-sharp knife or with the help of a blade, score the top of each loaf (3 to 4 slashes across each one). In fact, scoring the baguette is extremely important to achieve an even rise when baking. Spray some water on the top of the loaf before scoring.
- Cook for 10 minutes, then release the steam from the oven and turn the tray around for a further 8 minutes.
- After baking, you will get perfect golden baguettes. Let them cool down completely before slicing.

I hope you will love this amazing bread recipe when you give it a try!
If you like this article, please share it with your friends to encourage me!